Welcome to my Stone Mat Tutorial! I was originally inspired by an article in the August 2008 issue of Martha Stewart Living. When I was pulling together my grounding kit, I looked there to see how to make one of these stone "spa mats", as she calls them. Unfortunately, the supplies she suggested were no longer available from the vendor she mentioned, and after a quick trip to the orange version of the big box home improvement store, it became clear that I would have had to buy an entire case of stone floor tiles in order to complete my craft. So I struck out on my own and acquired these supplies:
Tacky glue,
Real river pebbles meant for decoration (I found them in the floral and section at Michael's),
Cotton cross stitch fabric (15in x18in),
2.25 inch wide ribbon (or you could use twill tape).
A note of caution: since this tutorial calls for real river pebbles, it may be the case that some of the pebbles are found to be broken or sharp. If, as you are working, you find a sharp piece, please discard it, and use a smoother piece in its place.
Also, please make sure you read the instructions all they way through before beginning, because there is a variation at the end, which you might like to incorporate.
First, measure around the perimeter of the piece of cotton cross stitch fabric. You will see in my pictures that I chose to make two 15x9 inch mats by cutting the 15x18 piece in half, but you can also just use it as-is for a larger mat.
Cut a piece of ribbon the length of the perimeter of the fabric, plus about two inches to overlap.
Iron the ribbon in half lengthwise so it has a nice crease down the center. Make sure you use the correct temperature setting for the type of ribbon you are using so nothing melts!
Then, inserting the cross stitch fabric into the crease in the ribbon, pin the ribbon in place around the edge of the fabric. I don't know of any professional ways to go around corners, I just fiddled with it until I liked it. If you are happy with the way it looks, and it lays flat enough to sew with a sewing machine, you've done a good job!
When it came time to overlap the two ends of ribbon, I snipped the corners off so they wouldn't poke out after the end was folded over.
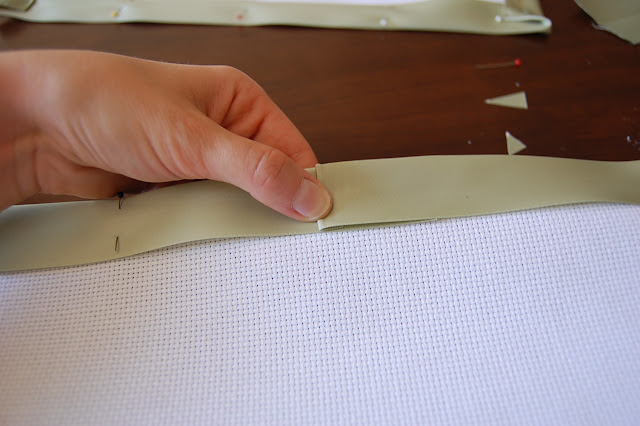
Fold the end over once . . .
. . . and overlap the start of the ribbon. Pin.
Then, sew the ribbon in place, starting where the ribbons overlap. I guided the sewing foot along the inner edge of the ribbon, as shown in the picture.
This is a gratuitous shot of my beautiful mint green, vintage sewing machine which I got at a tag sale for $35. I always get annoyed (read, jealous) when people say, "I found this awesome vintage thing for $2 at a tag sale!!!!", because I don't ever seem to find awesome things with ridiculously little price tags, but this just proves: Random inexpensive vintage finds can happen to you!!
When you have finished sewing the ribbon, lay the mat out on a piece of parchment or wax paper. This is to keep the glue from sticking to the table.
Now, slather on the glue.
Really slather!
Using a piece of cardboard, smooth out the glops of glue into one even layer. It should be pretty thick.
And then begin to sprinkle the pebbles all over the mat. Sprinkle them thickly. As you go, press down on the pebbles so that they are really stuck into the glue in one layer. You will notice that most of the pebbles have one broader side. As you press down on them, try to maneuvers them so that the broadest side is down in the glue. If they didn't happen to fall broad side down, at least maneuver them so that they are resting on a side and not an edge.
After your mat is covered in pebbles, if need be, you can add single stones to any spots that appear bare.
Let your mat dry for over 24 hours, to make sure that they glue is dry. You will probably find that, either right away, or as you use your mat, some of the less well secured stones will come off. You can just replace them with a dab of glue, and your mat should be as good as new!
Variation: before slathering glue on the whole mat, you can form a neater border by gluing a row of stones around the perimeter of the mat, about 3/4 to 1 inch inside the outer edge. Then you would proceed to sprinkle stones as indicated above.
Then you can enjoy the massage!!


Thank you for sharing this. I also need grounding, to steady me from thoughts, and to help me slow down.
ReplyDeleteI envy your sewing machine:-)
Karen
I am glad you found this useful!!!! And, please, let me relieve your envy by saying, my sewing machine is lacking a zig-zag stitch; it literally only sews in a straight line. Which has led to some creative rethinking of some projects, and complete abandonment of other. : )
Delete